French Provincial Console Table – Painted & Monogrammed

After - Vintage look to the photo and this one shows the colors a little more true

I unfortunately don’t have any “during the process” photo’s of this one, nor are my photos well staged or as good as I’d like for this one, but it was for a good reason and I didn’t really think ahead because of that :-)  This item was a gift, a Christmas gift actually, for our dear friends. I added a monogram to the top to personalize and hand detailed every corner, niche and some of the hardware I added, using a dry-brush technique, followed by 2 coats of brushed and cheesecloth polished Annie Sloan soft wax.

So it was more a love project, not a step by step, plus it was done over about 2 months when I could get days warm enough in November and December to paint in my workshop (our 3rd garage converted to my workshop but not yet insulated or finished out), so warm enough days to paint (over 55 degrees) were there, but not always when I was able to wield the paintbrush. Still, it got done in time for Xmas and that’s what counted. They are using it as an entry table and I did a mirror to match and added a crystal and burnished brass lamp to finish it off.

It’s done in home-made Chalk (not chalkboard) paint in colors, Behr: Burnished Clay and Farrow & Ball: Charleston Grey. I add a specific recipe/ratio of water and calcium carbonate (chalk) to flat acrylic paint/primer-in-one and it makes a very durable, color saturated, easy to work with and keep, chalk paint. I hand painted all of this, rather than spray. Partly because

Before (a summer garage sale find) – Nice 50’s solid wood, french provincial style, dovetailed drawers, in perfect structural condition, except for 1 drawer I repaired. Yellowish cream and sprayed gold in the detail areas (shudder). No hardware and pretty scratched up and a few stains, but gotta love Chalk paint for many reasons, not the least of which is no sanding or prep. I just clean it, then wipe down with mineral spirits immediately before I paint.

Before - 50's Wood Console Table in yellowish cream and gold

Before – 50’s Wood Console Table in yellowish cream and gold

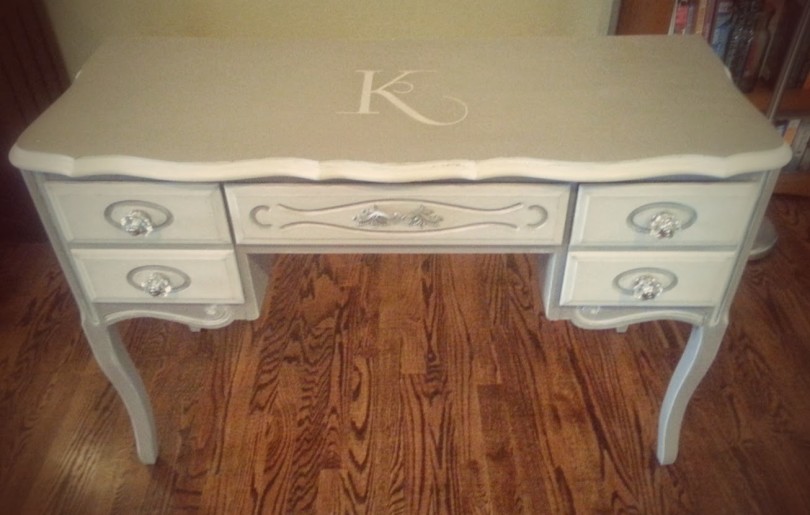
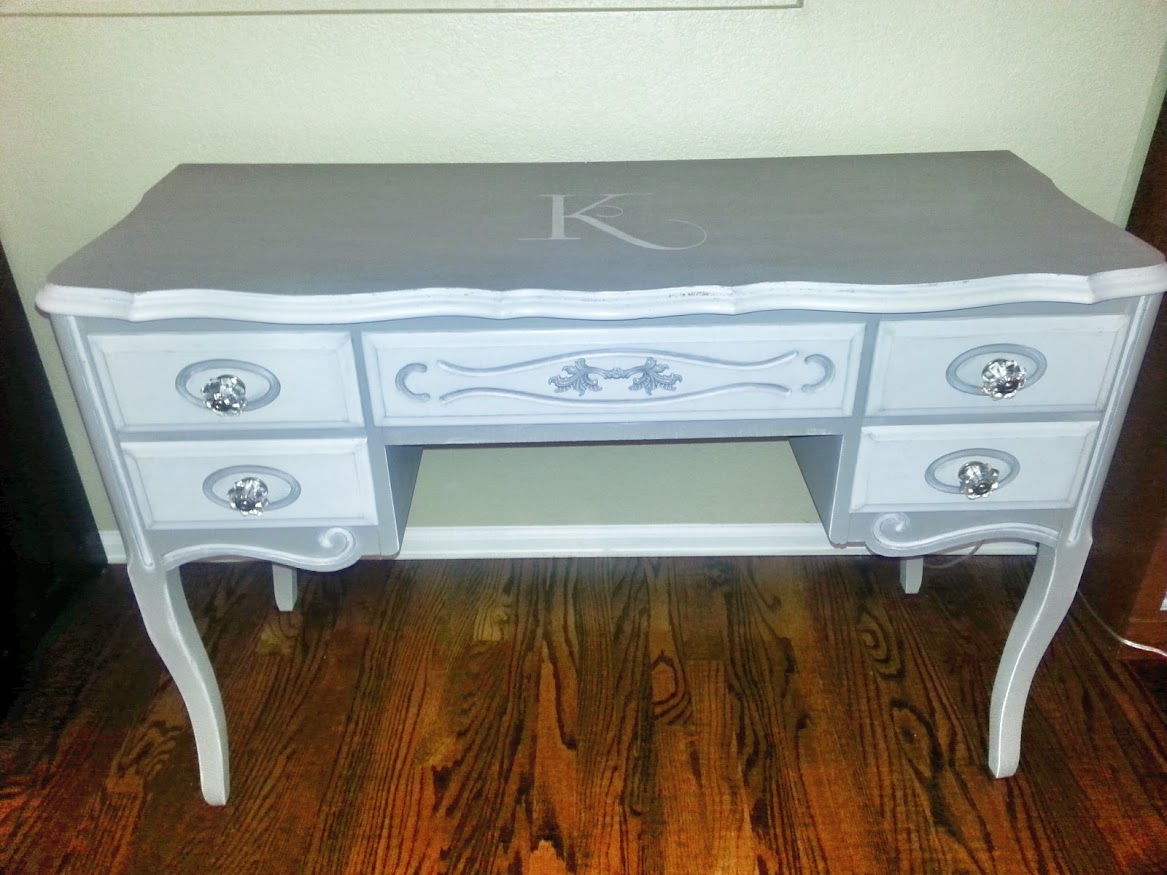
After – painted 2 tone, monogrammed, dry-brushed details and the only light distressing I did on this one, was the curvy rim edge of the table top. I opted for full paint with dry brushed details rather than all chippy and distressed, keeping in mind that this was for friends who run a little more contemporary, rather than Farmhouse, Rustic or Shabby style. Center hardware was a vintage one I had from another chest of drawers (which was missing some hardware, so I had to replace all and use these lovelies for this and other pieces), plus glass pumpkin style pulls from a stash I found at an antique store.

After - Vintage look to the photo and this one shows the colors a little more true

After – Enhanced Vintage look to the photo so that this one shows the colors a little more true


With matching painted mirror to hang above

After - Console Table chalk painted with matching painted mirror

After – Console Table chalk painted with matching painted mirror


And a flash photo that is a bit sharper, showing more detail where every edge, indent, crevice and corner was hand detailed :-) Monogram was done using my Silhouette cutter, so I was able to pick the right font and size, cut it out on the Silhouette and stencil it onto the top. LOVE the Silhouette cutters… another post on that to come.


Flash Photo of Console Table in more detail

Flash Photo of Console Table in more detail


Thanks for stopping by and I’ll have some newly finished pieces to show you soon !

sig


What is UpCycle exactly ?

UpCycle... It's many things

Depends who you ask, but I’ll give an idea of what it is to me, thus, this blog :-)

It’s IMAGINATION.

UpCycle is a catchall phrase for recycle, re-love, re-use, re-purpose, rethink, restore, re-imagine (all those “re” things), including, but not limited to…

  • Trying to make something nicer than it was, especially if it ends up being used again when it may have otherwise been wasted or ended up at the dump
  • Making use of space to give you more function (my Master Bath Built In is a perfect example of this)… we basically did a home improvement, yes, but it added something needed without spending a lot and using some things we already had on hand to do it. So we both improved and used recycled materials.. that = UpCycle on a DIY build project
  • Restoring something so it’s more functional, beautiful, funky, fitting, works again, usable, fashionable, artsy, serves a new purpose.
  • Rethinking how you use or look at something like a shoe box. piece of furniture or old electric cord. For instance, old (unsafe to use) electric cords are great to tie up bundles of scrap wood, they’re strong.
  • ReUse or Repurpose anything you can. Every large yogurt container is a paintbrush water pot or paint mixing pot. A plastic tray from Trader Joes with their awesome potato salad is perfect for a small foam roller paint tray. Jars are nail & screw storage or airtight ones are small touch-up paint containers to keep on hand for specially mixed colors. SO many ways to use things at least once more before it becomes trash.
  • “Curb Shopped” or Craigslist Free (or really cheap) furniture is your next painted farmhouse look piece or parts (like the legs on our bathroom built in) or remade into something else altogether
  • Changing something new into something more interesting/beautiful or using it for some different cool purpose. A bunch of $1 thrift store frames are your next family gallery with some paint and imagination. An old wood headboard is really easy to make into a bench.
  • Making something artful in a way that pleases you… think stencils, decoupage or fabric covering. All classic, easy ways to make something artful
  • Saving something that could still be beautiful and/or useful, especially if it’s vintage or antique and really worth saving. Double bonus if it avoids a situation where you would have been buying made-in-china new things.
  • It’s finding ways to use things differently to save money, time, space, peace of mind, the planet or your sanity (being creative helps you live longer and it’s very healing).

Upcycling is Imagination. It’s whatever is important to YOU. That’s the idea behind upcycling in my view.

So you’d think I’d eschew places like Ikea…. ohh noooooo. I LOVE Ikea. Other than the ways they are working toward being way more Eco Conscious than most other huge retailers, in many ways, (which is a whole other blog and “Eco” is not what upcycling is only about, but throwing it in… good article HERE), the stuff they sell is affordable stuff with HUGE upcycling potential when you find you need to buy new. I’ll be featuring some of our own Ikea hacks, ways to make it last (or repair things) and some Ikea upcycles in coming months.

BUT, some things just shouldn’t be upcycled by us average junk lovers (a mattress comes to mind) and there is no denying when you fall in love with a piece of furniture you couldn’t possibly make yourself or someone elses artistry. Get it if you love it. But support local upcyclers and artists whenever you can, rather than just the Chinese economy and do what you can to embrace that idea if it moves you.

Upcycling isn’t just about recycling old stuff and it doesn’t need to be “glam” or “shabby” :-) it can be sleek or perfectly restored rather than changed, whatever floats your boat, but it’s nice if it works out the way you want it to.

So, bottom line, upcycling is many things and I haven’t even come close to all the ways it can be done, not to mention how fun it is and generally good for the planet, local economy and your own creative satisfaction.

Cheers !

sig


Enjoy UpCycling ! Feel free to ask any questions you like in the contact form below.


[contact-form]

Shallow Built In for Bathroom

Before & After Bathroom Built Ins

I’ve always had this annoying “nook” in the master bath that I’ve been vacillating about since we moved into this current home we bought in May 2013. Actually, for an expensive new build, there’s a lot I love about this house, but a lot that is poor design, void of character or just needs “doin’ ” ya know ? So I had a bench with a mirror above it in this “nook” for a long time while I thought it through and got around to addressing the problem (oh and that bench/stool.. a soon to be upcycled project, pair of them).

Anyway, back to the built-in. To avoid shockingly long posts, I’ll first show the before and after here, with the back story, then in the coming days, tell you what/how Mr Stud and I did and why.. (name changed to protect the not-so-innocent husband that is my partner in crime in all larger projects and generally awesome to be married to).

Before - useless wall space with switches & floor vent

Before – useless wall space with switches & floor vent

The photos above, was the “nook” before. Seated between the WC wall and the closet door (yes, closet is in the master bath… not a choice location, but it’s where it is.. compromises, right?) It was only 28 inches wide, door trim to wall, about 8 inches deep and 7ft to the top of the door trim. Oh and did I mention the [small & only] vent/register for this large master bath/closet is right there in the floor ! So there was no modifying, in a simple way that made sense, something like a bookcase we already had or searching one out on craigslist or a thrift store. The dimensions, vent and OH YES, the LIGHT SWITCHES that are there, gave me a headache just thinking of all the hacking up, bodging back together and awkward mess it would turn out to be.

Soooo, the only choice that was going to look any good (resale always in mind, because ya never know), was a custom built-in. So for this one, I didn’t even bother googling inspiration photo’s or making an IdeaBook Folder on Houzz, because I knew what I’d like for extra storage and what would look good. I just scribbled up a basic design based on what would work for me regarding storage options (you will come to learn I am obsessed with boxes, baskets & containers).This was the drawing (totally out of scale and not even resembling proportion) of my design. Me doing this, helps Mr Stud and I not behave like 5 years olds when he makes no effort to read my mind and discern what I want to build and how it should turn out when he helps me with a project.

Scrawled Design drawing with notes, some measurements and not even close to scale !

Scrawled Design drawing with notes, some measurements and not even close to scale !


After working out what I’d need, doing yet another drawing for the peeps at Home Depot laying out measurements & how I wanted a sheet of 4ft x 8ft piece of sanded 3/4 inch plywood ripped to fit in my Jeep (barely), we went and got the wood, I picked and grabbed the various moulding and trim I wanted, poked around for “oops” paint (that’s a thing with me every time I go to home depot) and the below was the result. MUCH more to tell of course, but I’ll go into details in coming posts, with hints and tips etc, plus basics on how to do this yourself.

Side view of trimmed out moulding to make it as finished and seamless with the door trim as possible.

Side view of trimmed out moulding to make it as finished and seamless with the door trim as possible.

Front view of how it nicely fills the space and gives tons of storage in baskets, jars & shelves

Front view of how it nicely fills the space and gives tons of storage in baskets, jars & shelves

Before anyone asks, I’m originally from Australia, so my choice of words like “moulding” or “colour” are just habit and I’ll likely use both USA or Queens English spelling as it suits me on a given day *wink*. Other stuff, my bad grammar or typo :-) .. just let me know and I’ll fix it.

Just to finish up, we’ve done a few things inside and out in the almost 2 years we’ve been here, but last year was consumed by 6 and 11 month warranty work by the builder and mostly outdoor stuff we did (you’ll see that in other posts) and I’ll write more in the About area regarding our journey from landing in the USA, renting, buying a Townhouse and now a big sprawling ranch and why, if you’re interested :-)

Thanks for stopping by !

sig

Welcome. Thanks for Visiting ! A little about me.

chezlabeled

I will put most of this under “about me” in the menu, but I need a place to start my blog and it just seems like a good idea to tell you “Thank You” for visiting and a little about me :-)
I am Chez of chezzdesign.com, my Etsy Store and Online Store. This blog isn’t to plug my sales, but my store is there (when I get it up and running) if you like to shop for artisan decor, jewelry and handy things.
And that’s what I do. DIY projects, home improvement, plus art to wear, use, decorate with and just enjoy. I’ll get more into the UpCycle part later.

I am also disabled in that I have Rheumatoid Autoimmune Disease (aka Rheumatoid Arthritis, but most advocacy is trying to lose the arthritis part because it’s just one symptom and that symptom is so far from, say, osteoarthritis in your knee, it’s like a grape to a watermelon)… anyhooo, it’s another thing I’ll expand on in the About Me section, but it’s relevant to this blog because it’s substantially harder for me to do things now, than when I didn’t have it, so I’m going to give tips, hints, hacks, work-arounds and modifications to jobs and tools whenever possible.
As my side-kick Husband who shall be known as Mr Stud, says “EVERYONE wants a short cut or easier way” .. so we agree as long as it’s not a shoddy short cut and not something we didn’t test or use, you’ll get informed about it.

That’s it for today. Again, welcome and hope you enjoy our projects as we do them to improve our home (addicted to DIY and Decorating) and for fun and arts sake.

Chez & Mr Stud

Image7